Thunder Paint Car Paint - 946ml Can
Car paint Thunder Paint 946 ml
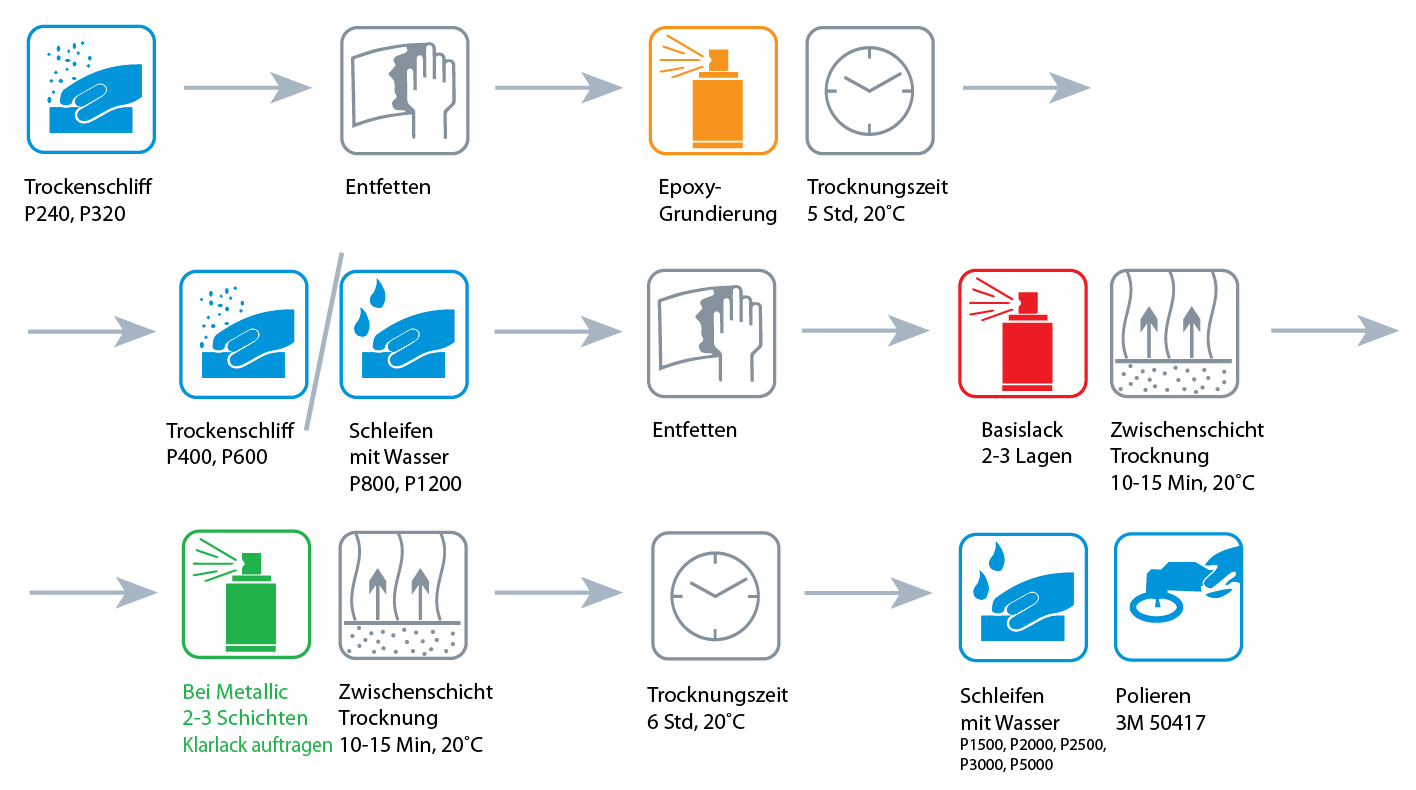
Instructions–Scheme for painting a new metal component
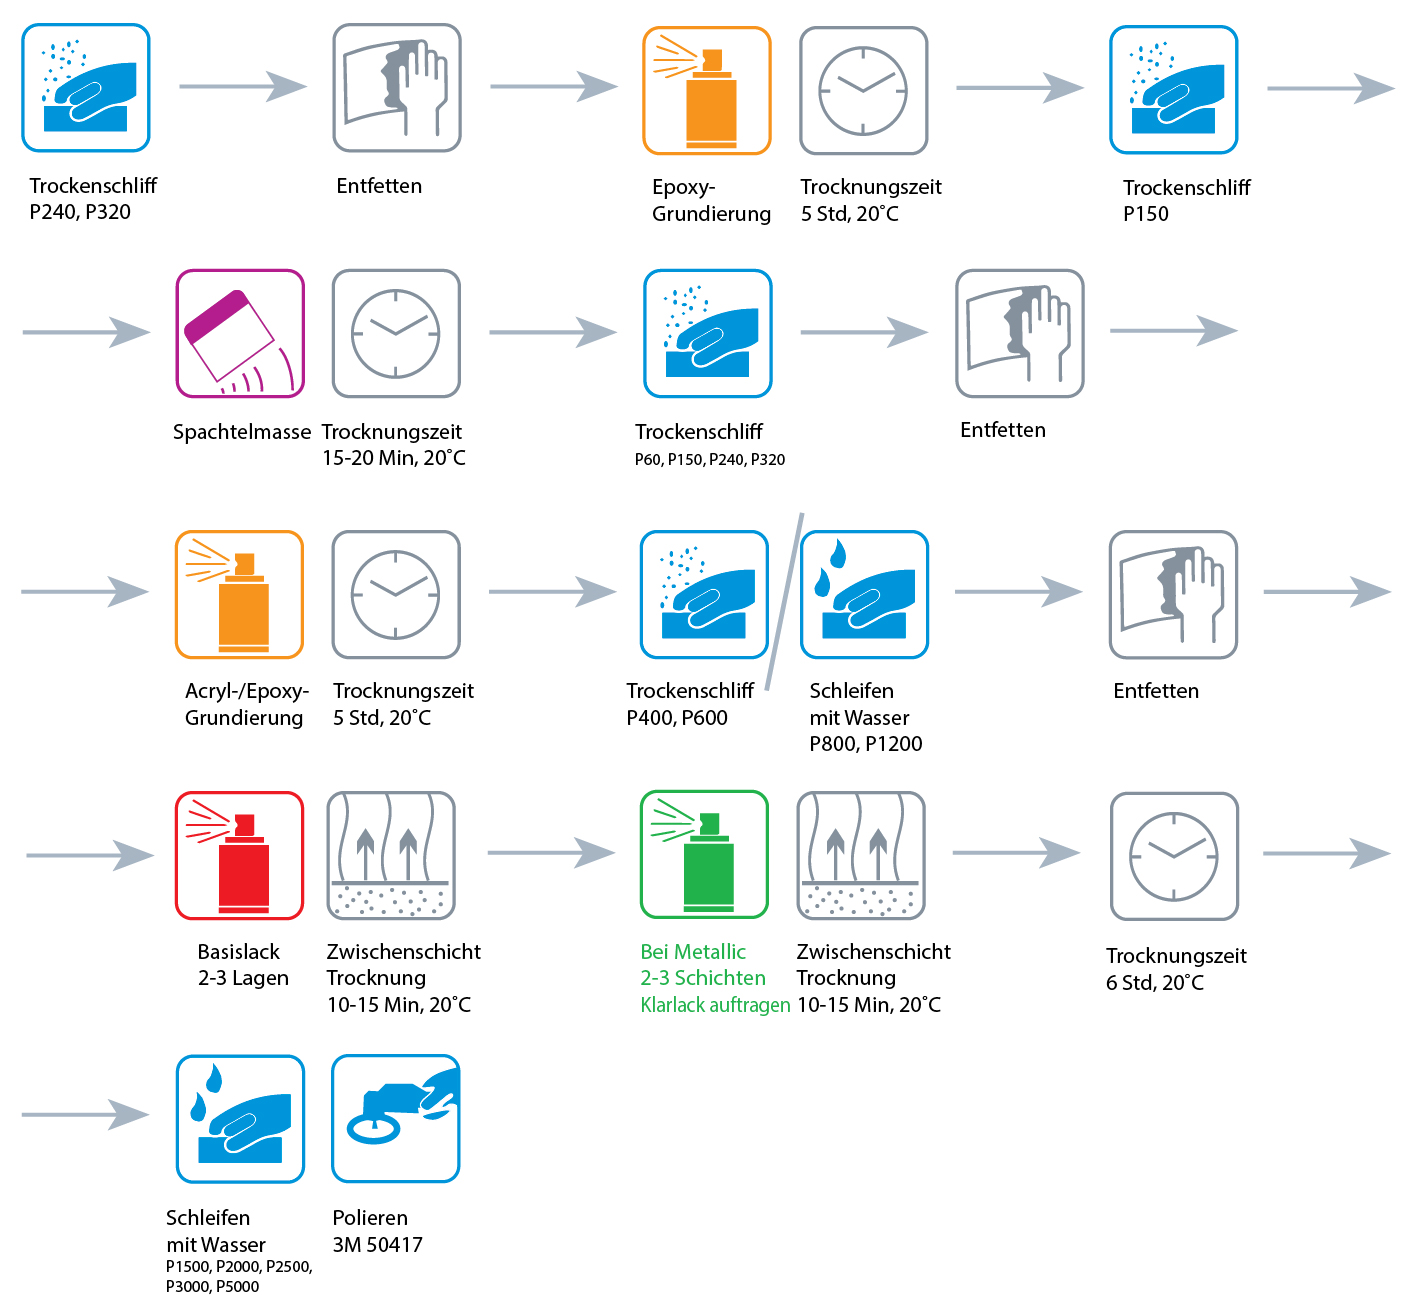
Instructions – Scheme for painting a repaired metal component 
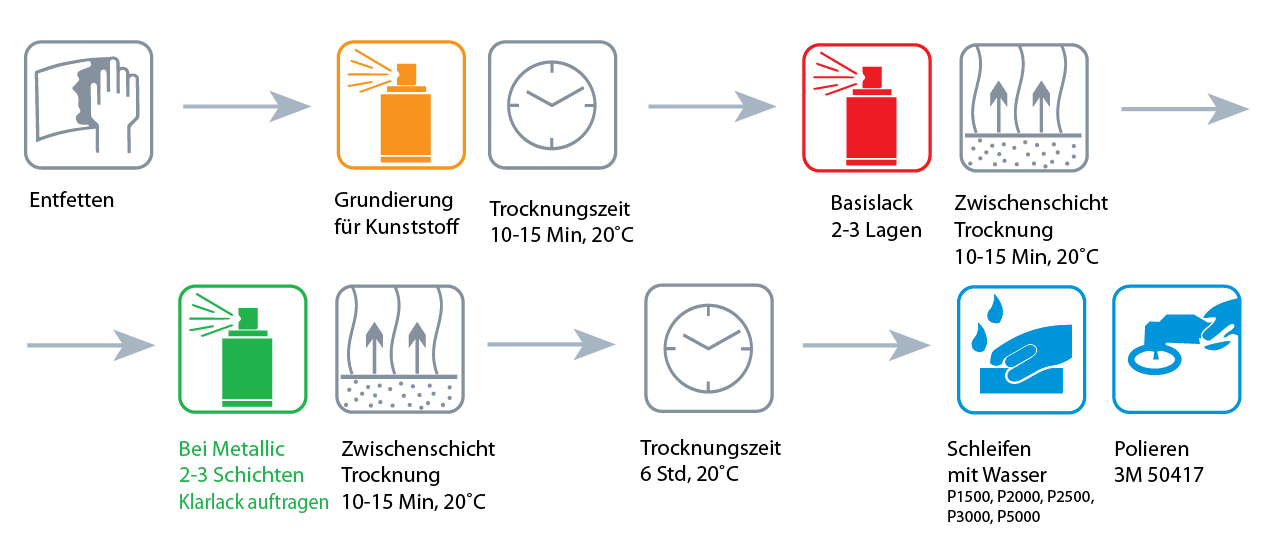
Instructions–scheme for painting a new plastic component
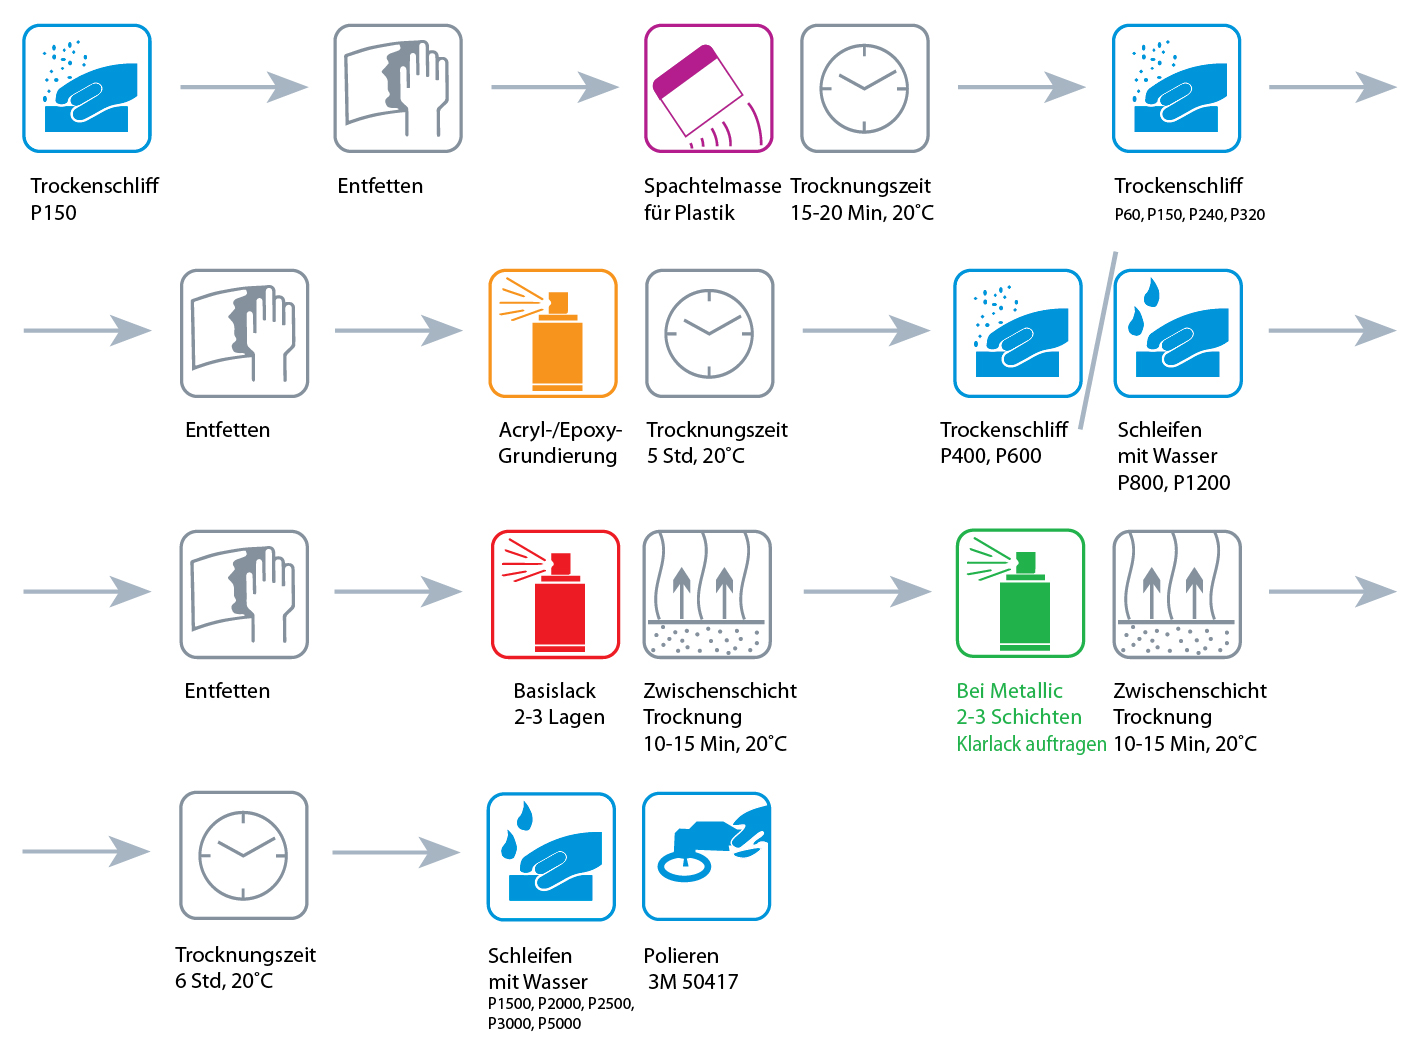
Instructions – Scheme for painting a repaired plastic component 
Instructions–Scheme for painting an undamaged component on old paint 
To paint a car, you need to understand which painting materials are used and in what order they are applied.
We will not discuss all types of painting materials, but will limit ourselves only to those that are useful for self-repair.
The following materials may be needed for paint repair: zinc primer for metal, epoxy primer, plastic primer, aluminum filler, plastic filler, sandpaper or Scotch-Brite (abrasive fiber), degreaser, paint, clear coat, possibly a temporary solvent, and polish. You can also add fiberglass filler for rusted areas, plastic weld mesh, or a bumper repair kit to this list.
In order:
Zinc primer for metal. Used as active corrosion protection. Applied to bare metal, including non-ferrous metal, that has been cleaned of rust and degreased. Particularly suitable for treating welds. Serves as a primer over which paint can be applied. However, to achieve a thicker paint layer on the zinc, it is better to apply an epoxy primer and then paint. Putties suitable for non-ferrous metals can also be applied over it. The zinc primer can be applied at temperatures from -35 ° C to +50 ° C. It can withstand temperatures from -60 ° C to +150 ° C (briefly up to +210 ° C). After 6–8 hours, the next material can be applied (putty, primer, paint) – the zinc does not require sanding. The high matt finish of the primer allows for the application of paint materials without prior sanding. We recommend applying an epoxy primer over zinc.
Epoxy primer . Typically gray. Applied to rust-free, sanded, and degreased metal, including non-ferrous metals. It can also be applied to surfaces treated with zinc primer, old paintwork, and filled surfaces. Filler can also be applied to this primer. It is characterized by high protective, filling, and insulating properties and also works in the wet-on-wet process. This primer can be considered multifunctional.
What does it mean that primer has insulating properties? It often happens that when sanding filler, adjacent paint layers are sanded along with the filler. These areas must be primed. During priming, the primer solvent penetrates the sanded areas and can damage the underlying paint layers at the sanding edge. To avoid such problems, an epoxy primer is used to insulate these areas.
“High filling power of the epoxy primer” – this roughly means a layer thickness that is sufficient to fill small defects on the primed surface (scratches from sandpaper, pores in the filler, etc.).
The “wet-on-wet” method – after applying the epoxy primer, the paint can be applied directly after 1–24 hours at +20 ° C without intermediate sanding.
The primer contains a significant amount of zinc phosphate, which provides additional corrosion protection for the metal. It can withstand temperatures up to +150 ° C (short-term exposure to +180 ° C). The minimum application temperature is +10 ° C. At +20 ° C: intermediate drying time 5–10 minutes; assembly strength 4–5 hours; complete drying 24 hours; painting without intermediate sanding using the "wet-on-wet" method after 1–24 hours. After 24 hours, dry or intermediate sanding with P360–P600 grit sandpaper is required before painting, and with P180 grit sandpaper before filling. Acrylic primers, basecoats (metallic, pearl), fillers, and acrylic paints can be applied over the primer. Number of coats: 2–3.
Primer for plastic . Usually transparent, possibly with light metallic pigmentation. Applied to bare plastic. Acts as an adhesion promoter, meaning it improves the adhesion of subsequent materials to the plastic. It has no filling power and is applied thinly. Minimum application temperature +10 ° C. At +20 ° C: After 10 minutes, acrylic primer, epoxy primer, or any automotive paint can be applied. Number of coats: 1.
Aluminum filler. Gray. Can be used on metal surfaces (ferrous and non-ferrous metals, galvanized) and plastic (there are special fillers for plastic – these are more elastic, but aluminum filler can also be used as a universal filler). For better corrosion protection of the metal, we recommend applying a zinc coating or epoxy primer to bare, rust-free, and degreased metal before filling. Why do we highlight this filler rather than a universal or fiberglass filler? Because it is multifunctional and has excellent physicochemical properties. The main advantages of aluminum filler: minimal shrinkage after drying, stable hardness on metal surfaces (gives the repair additional strength), resistance to vibration loads, temperature resistance up to +120 ° C, ideal for smoothing transitions between the repaired surface and the old paint, pasty consistency, and non-porous. Surface preparation before applying aluminum filler:
- For black metals: Remove rust, sand the surface dry with sandpaper P80-P120, degrease
- For galvanized metals and aluminum: Sand the surface dry with P150-P180 sandpaper and degrease. We recommend applying a galvanizing additive to the galvanized surface without sanding the metal first. Sanding will damage the original zinc coating. Once the galvanizing additive has dried (6-8 hours), the surface no longer needs to be sanded; the filler can be applied directly. For additional corrosion protection, an epoxy primer can be applied over the galvanizing additive, and after it has dried (24 hours at +20 ° C), the filler can be applied.
- For metal with epoxy primer: Sand the surface dry with P150-P180 sandpaper, degrease.
- For metal with galvanizing additive: Degrease the surface without prior sanding
Mixing ratio of filler and hardener: 100 parts filler and 2–3 parts hardener. Avoid overdosing the hardener, as the topcoat (paint or clear coat) may change color at this point and the filler will take longer to dry. After mixing with the hardener, the filler has a working time of 4–5 minutes at +20 ° C. Recommended processing temperature: +10 ° C to +25 ° C. The filler can be sanded 20–25 minutes after application at +20 ° C. For sanding, use sandpaper with grit P80–P320. Coarse sanding – P80, then P150, then P240, and fine sanding – P320. After final sanding, degrease and apply epoxy primer (there are many primers that can be applied over filler, but since this is a DIY repair, we recommend epoxy primer, which is versatile).
Plastic filler . Typically black. It is highly elastic and does not crack even with slight deformation of the plastic. It is applied to raw, sanded, and degreased plastic without prior plastic primer. The main advantages of plastic filler: minimal shrinkage after drying, stable elasticity, resistance to vibration loads, temperature resistance up to +120 ° C, pasty consistency, and non-porous.
Surface preparation before applying the plastic filler: Sand the plastic dry with P150-P180 sandpaper, degrease.
The mixing ratio of filler and hardener is 100 parts filler and 2-3 parts hardener. Avoid overdosing the hardener, as the final coating (paint or varnish) may change color at this point, and the filler will take a long time to dry. After mixing with the hardener, the filler can be used for 4-5 minutes at +20 ° C. The recommended processing temperature is between +15 ° C and +25 ° C. The filler can be dried at +20 ° C after 15-20 minutes and then sanded. Use sandpaper with grits from P80 to P320 for sanding. Coarse sanding – P80, then – P150, then – P220, and fine sanding – P280. After fine sanding, degrease the surface and apply an acrylic primer (primarily suitable for application over fillers).
Sandpaper . There are two main types of sandpaper:
- for dry processing
- for wet processing
We recommend using wet sandpaper only for polishing. In all other cases, dry sandpaper should be used, even on plastic surfaces. Fillers and primers are hygroscopic (absorb moisture). If you sand fillers or primers with water, moisture will penetrate the metal. You won't be able to paint the vehicle in time, and the metal beneath the paint will begin to oxidize and corrode over time. On plastic parts, wet sanding also carries the risk of the filler and primer not drying properly, which will compromise the final repair result.
Sandpaper grit: Which grit is coarser, P80 or P240? The higher the number, the finer the sandpaper, and vice versa.
Fillers are sanded with dry sandpaper with a grit of P60 to P320 (in 100-grit increments). Primers are sanded with dry sandpaper with a grit of P320 to P600 (in 100-grit increments). Sandpaper for wet polishing starts at P1500 and goes up to P6000 (from P1500 to P2500 in 500-grit increments, and from P3000 to P6000 in 1000-grit increments). For polishing, P1500-P2500 grit is usually sufficient. Sanding marks are then removed with polishing paste. Polishing is used to remove paint defects (dust on paint and clear coat, runs, etc.) and to achieve a uniform, glossy surface.
It should be noted that dry sandpaper with a grain of P600 corresponds to a wet sandpaper with a grain of P1200.
Varnish. It can be roughly divided into two types:
- which is not coated with clear varnish – final coating (1K alkyd, 2K acrylic, 1K acrylic, 2K polyurethane, etc.)
- which is covered with clear varnish – base coat – these are matt colors (without metallic and pearl effect), colors with metallic effect, pearl effect and Xirallic.
Paints that are not coated with a clear varnish are resistant to physical and chemical stress and serve as a final coating. They are resistant to UV radiation, abrasion, salts, etc.
Paints coated with clear varnish are decorative (in simple terms, for visual appeal). They are not resistant to UV radiation and physical and chemical stresses. Therefore, they are coated with a clear varnish, which provides resistance to all of the aforementioned stresses.
The paint is applied over an old coat of paint or a primed surface (acrylic or epoxy primer). The surface must be dry-sanded and degreased beforehand. If you are applying a paint that will not be clear-coated, use P400 grit sandpaper or a red Scotch-Brite sponge (sanding pad) to prepare the surface. If you are applying a base coat that will be clear-coated, use P600 grit dry sandpaper or a gray Scotch-Brite sponge. Clear-coated paint is more fluid, so a finer abrasive is required.
All paint manufacturers recommend applying paint materials at +20 ° C (68°F). The can should be at room temperature (+20 ° C). The paint is applied in 2–3 coats, allowing 10–15 minutes of drying time between coats. Hold the can 25–30 cm (10–12 inches) from the surface. Shake the can for 2–3 minutes before use, then spray to the side to avoid dripping. After that, paint can be applied.
Principle of metal painting:
- First option: Apply zinc to the metal, and after 6 hours without sanding, apply epoxy primer. After the primer has dried, dry sand with P180 abrasive, degrease, and apply aluminum filler. Then dry sand the filler with P80–P320 sandpaper in 100-grit increments, degrease, and apply epoxy primer. After 1–24 hours without sanding, apply paint (after 24 hours of dry primer, sand under the clear coat with P400 sandpaper (or red Scotch-Brite) for acrylic and alkyd paints, and P600 (or gray Scotch-Brite) for basecoats, degrease, and then apply paint). Paint is applied in 2–3 coats with 10–15 minutes drying time. If necessary, then apply 2–3 coats of clear coat, each with 10–15 minutes drying time. After the clear coat has dried, the surface can be polished. If no filling is carried out after zinc and epoxy primer, the epoxy primer is finely sanded as a base for the paint.
- Second option: The paint is applied to a matted (dry with P400 sandpaper (or red Scotch-Brite) for acrylic and alkyd paints and P600 (or gray Scotch-Brite) for basecoat under clear coat) and degreased old paint surface.
Principle of plastic painting:
- First option: If necessary, apply a plastic filler, then dry-sand the filler with P80-P320 sandpaper in 100-grit increments, degrease, and apply an epoxy primer. After 1-24 hours, the paint can be applied without sanding (after 24 hours, the primer must be dry-sanded with P400 sandpaper (or red Scotch-Brite) for acrylic and alkyd paints, or P600 (or gray Scotch-Brite) for basecoats under clearcoat, degreased, and painted). The paint is applied in 2-3 coats, 10-15 minutes apart. Then, if necessary, apply a clear coat, also in 2-3 coats, 10-15 minutes apart. After the clear coat has dried, the surface can be polished.
- Second option: The paint is applied to a matted (dry with P400 sandpaper (or red Scotch-Brite) for acrylic and alkyd paints, and P600 (or gray Scotch-Brite) for base coats under clear coats) and degreased old paint surface.
- Third option: If you want to paint a new, previously unpainted plastic part, degrease the plastic surface, then apply plastic primer, and after 10-15 minutes, apply varnish and, if necessary, clear coat.
Bottled car paint 946 ml
Car paint in cans from Thunder Paint
– is an enamel car paint, packaged in 946 ml cans. This Italian-made car paint ensures an even, high-quality finish on the car, its rims, and individual parts. Purchasing car paint in 946 ml cans is especially worthwhile if you plan to paint the entire body or large sections of the vehicle. Thunder Paint car paint in cans is a car paint whose price will pleasantly surprise car owners, and whose paint quality will convince them of the right choice.
Thunder Paint's canned car paint is available in a very wide range of colors with popular effects such as metallic, xerotic, and pearl.
Car paint in cans – choose the right paint color
You can select the right paint color for your car based on the VIN code, car model, or color code. If you're unsure, the consultants at the Autocolors car paint shop will be happy to help. Canned car paint from Thunder Paint is a great choice if you want to paint your car affordably and with high quality. These car paints spread evenly over the body surface and are highly resistant to environmental influences – UV radiation, frost, high humidity – ensuring a long-lasting, aesthetic appearance of the vehicle and, above all, protection against corrosion.
Buy car paint in cans – Car paint Thunder Paint
Canned car paint is used to paint a car cost-effectively, as the larger the quantity, the lower the price. The price of car paint in cans is always lower than that of spray paint. We're happy to help you calculate the required amount of paint during a consultation at the Autocolor7 car paint shop.
Thunder Paint is a mid-priced car paint. As with other car paints, the price depends on the color, paint type, and fill volume. At Autocolor7, you can purchase car paints with effects such as metallic, xerotic, pearl, or simple colors.
Buy car paint
Buy liquid rubber from the Italian manufacturer Thunder Paint in cans of various sizes – 236, 473, 946 ml. You can also purchase liquid rubber from us in spray cans.
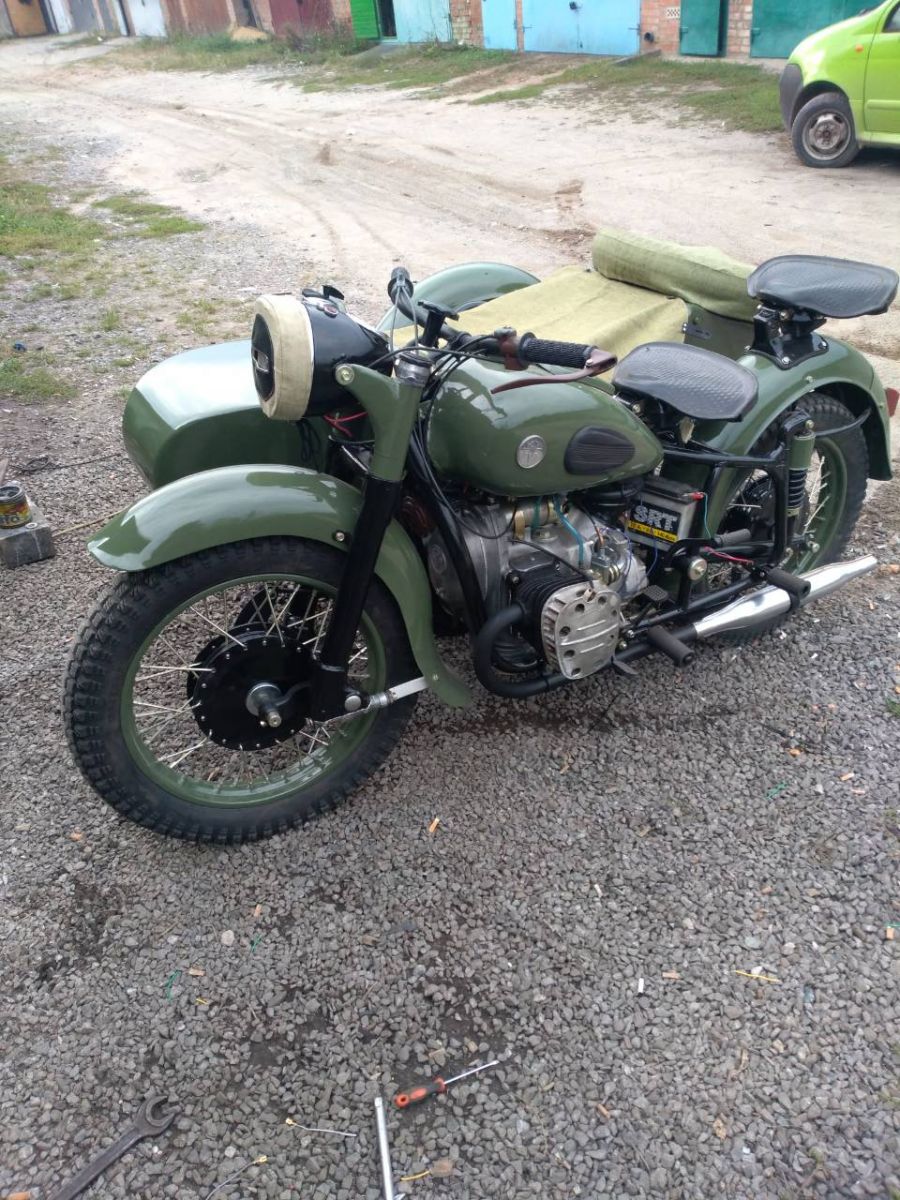
Do-it-yourself motorcycle restoration
Painting a military motorcycle with Thunder Paint car paint (Italy)
Restoring a motorcycle on your own isn't as difficult as it might seem at first glance. Successfully repainting an old motorcycle depends on your determination, diligence, and, of course, choosing the right automotive paint for motorcycle restoration.
Today we would like to show you photos of a restored military motorcycle painted with Thunder Paint (Italy) from the car paint and car care shop Autocolors.
How do you paint a motorcycle yourself?
Even under simple conditions, repainting a motorcycle in your own garage isn't difficult if you select the right materials and a few tools for restoration work. After that, you just need to carefully follow the painting instructions, which you can either read or view as schematics on the websites for various paint materials. Liquid rubber in cans, car paints in aerosol cans, primers, textured car paints for sills and mirrors—each material has its own, albeit not particularly specific, application features. Therefore, we recommend that you familiarize yourself with the instructions on the relevant websites before starting the painting process, or even better, when choosing the type of paint. Customer reviews of car paint show that if you want to paint the motorcycle in the "original" color, you can easily select the color using the online car paint color selection service .
Liquid rubber Thunder Paint – paint in cans for restoration and painting
Do-it-yourself motorcycle restoration can be done with both spray and canned automotive paint. Liquid Rubber Thunder Paint is available from the auto paint and car care shop Autocolor7 in 236, 473, and 946 ml cans, so you can purchase rubber paint for complete restorations or in small quantities for individual motorcycle covers.
The Italian rubber paint Thunder Paint was developed for the professional painting and restoration of cars, motorcycles, quads, scooters, and agricultural vehicles. Painting an old motorcycle with liquid rubber is no big deal, even in your own garage, as numerous customer reviews of Thunder Paint car paint confirm. Liquid rubber in cans is easy to apply if you have a spray gun. It's also cheaper to buy rubber paint in cans than to order it in a spray.
Liquid rubber is easy to spray on during motorcycle restoration, covers surfaces of any complexity well, and reaches even hard-to-reach areas of the vehicle. You can buy automotive paint for motorcycles in any color. Please note that you can purchase either a ready-to-use paint (automotive paint that does not require additional painting) or a basecoat with a clear coat spray can. Painting an old motorcycle, restoring damaged new motorcycle parts, or artistically tuning a vehicle are all easily accomplished with rubber paint.


